About VM Lifecycle
Flexible Compute Unit (FCU) virtual machines (VMs) have a specific lifecycle, from their creation to their termination. You can manage their lifecycle with different consequences on their allocated or attached resources.
Creation
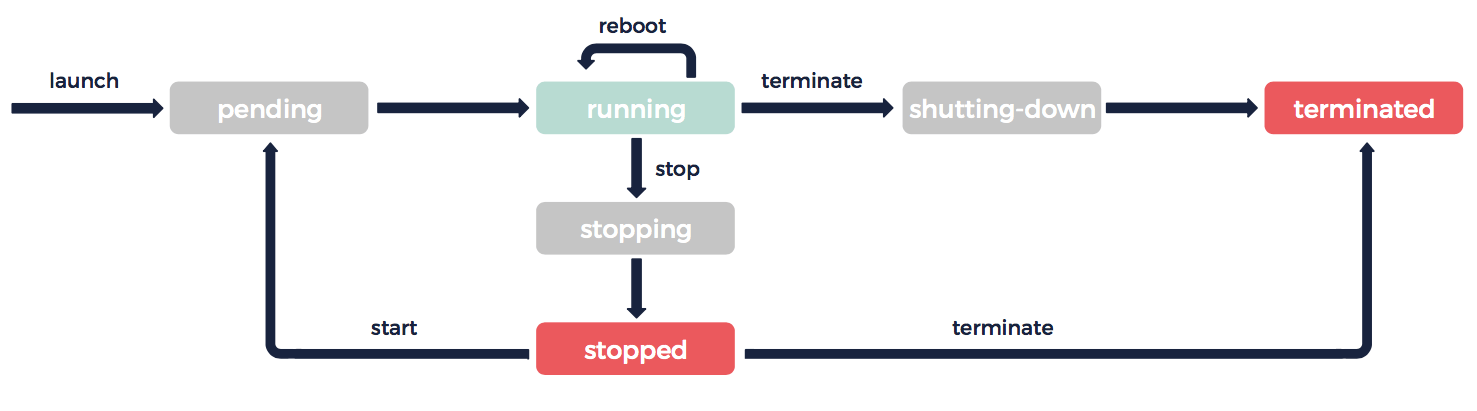
The creation of a VM describes both the actual creation and the starting of the VM as a whole. Once the VM is created, it enters the pending state until it is started and ready to use. The state of the VM then changes to running.
Physical resources are allocated to a VM upon its creation. Choosing a VM type allows you to define the hardware of the VM’s host computer. Choosing or creating an OUTSCALE machine image (OMI) allows you to define an operating system (OS), a configuration, as well as potential software applications to install on the VM. For more information, see About OMIs.
The VM receives a unique VM ID, as well as a private IP and an associated private DNS name that can only be contacted within the Cloud. If you create a VM in the public Cloud, it also receives a public IP and an associated public DNS name. This public IP is temporary and changes every time you stop and start the VM. For more information, see About VMs > General Information About VMs.
For more information, see Configuring a VM with User Data and OUTSCALE Tags. |
You can also attach network interface cards (NICs) to a VM during or after its creation to partition its network. For more information, see Network Interface Cards (NICs).
Stop and Start
You can stop a running VM at any time, and then start it again. Stopping a VM using the API corresponds to shutting it down using the operating system (OS) command.
You can also force a VM to stop. When doing so, the VM stops without properly exiting running applications.
|
Forcing a VM to stop may damage its system. |
When you stop a VM, it transitions to the stopping state and then to stopped. When you restart a stopped VM, it transitions to the pending state and then to running.
When stopping and starting a VM, it keeps:
-
Its VM ID
-
Its private DNS and IP
-
The public IP attached to it and fixed using the
osc.fcu.eip.auto-attachOUTSCALE tag (if applicable)
|
If the VM is not tagged with the |
-
Volumes attached to it (if applicable)
However, the public IP and public DNS name assigned at creation to a VM of the public Cloud change through the stop and start process. Data stored in the memory is also erased when stopping the VM.
When a VM is stopped, you can modify its attributes like its VM type (amount of vCores and memory). For more information, see Modifying a VM Attribute.
It is also recommended to stop the VM if you want to treat a volume attached to it. To do so, you need to detach the volume from the VM once it is stopped and to attach it to another VM to treat it. Before restarting the original stopped VM, make sure to reattach the volume to it using the same device name specified in its block device mapping. For more information, see Attaching a Volume to a VM, Detaching a Volume from a VM, and Defining Block Device Mappings.
If the VM you want to stop is registered with a load balancer, it is recommended to deregister it before stopping it, and to start it before registering it again if needed. For more information, see Load Balancing Unit (LBU).
Force Stop
If a regular stop does not work on your VM, you can also force it to stop. Forcing the VM to stop is equivalent to unplugging a computer, which means that the system may not stop properly.
|
Forcing a VM to stop may damage its system and lead to data loss. Ensure that you no longer need it or that you have backed it up. |
|
You can view the console output of the VM to check if there is any current issue. To do so, see Viewing the Console Output of a VM. |
The following list presents the general reasons why a VM could be unable to stop properly:
-
A process is running, which prevents the VM from stopping.
The most frequent cause is that a process is using a filesystem, meaning that an operation on the volume is not finished yet. This prevents the filesystem from being unmounted, which is required to stop the VM. That is why you need to ensure that no process is using a filesystem (for example, NFS or CRFS). If any are, follow one of those three options before trying to stop the VM again:-
Wait until the process ends.
-
Stop the process.
-
Unmount the volume on which the process is running.
-
-
An update is in progress (for example, a Windows update).
|
Do not force a VM to stop during an update, as it may damage your VM or prevent it from starting again. Some updates may take a lot of time (up to several hours) on small VM types. |
-
There are issues with your ACPI calls, which are necessary for VMs to stop properly. The two main causes are:
-
The VM has crashed. In this case, ACPI calls are ignored.
-
The pci-hotplug and acpiphp modules are not installed on your VM, so ACPI calls are not supported. This may happen if you used your own custom OMI to create your VM.
You can check the /etc/modules directory to check whether they are installed:
-
# /etc/modules: kernel modules to load at boot time.
#
# This file contains the names of kernel modules that should be loaded
# at boot time, one per line. Lines beginning with "#" are ignored.
# Parameters can be specified after the module name.
pci-hotplug
acpiphp
If the modules are not installed, you can create your own custom OMI using an official OMI, and then create a new VM.
|
If the VM does not stop when using a Force Stop, contact our Support team. Ensure you have backed up your VM, as the support team will need to shut it down, which could lead to data corruption. |
Reboot
You can reboot a running VM at any time using the API. This corresponds to rebooting the OS. When rebooting, the VM restarts without going through the stop and start process.
The VM stays in the running state and keeps all its allocated resources. Data stored in its memory also remains available after the reboot.
Termination
You can terminate a VM that you no longer need. Terminated VMs cannot be recovered. The VM first enters the shutting-down state, reaching the terminated state once the termination is completed. The VM remains visible in the terminated state for 1 hour, without any possibility to recover it.
When terminating a VM, its corresponding physical resources are released and data stored in its memory is erased. If a public IP is attached to the VM, it is released but stays allocated to your OUTSCALE account.
The behavior of BSU volumes when terminating the VM they are attached to depends on the block device mapping. By default, the root device of the VM is deleted while other volumes attached to it are detached. For more information about how to set this behavior, see Defining Block Device Mappings.
You can also configure two types of termination protection:
-
DisableApiTermination: This attribute enables you to prevent VM termination (by default, enables termination). -
InstanceInitiatedShutDownBehavior: This attribute enables you to define the VM behavior when you stop or terminate it. By default or if set tostop, the VM stops. If set torestart, the VM stops then automatically restarts. If set toterminate, the VM stops and is terminated. You can, for example, automatically terminate a VM at the end of an application by setting this attribute toterminateand asking the VM to stop when the running application is closed.
These two termination protection attributes can be defined when creating the VM and modified afterward. For more information, see Modifying a VM Attribute.
Related Pages